


You aren’t a builder. You aren’t an architect. You just want to know if that wall is load-bearing before you drill into it.
Reading house plans feels like cracking a code. Pages are stuffed with cryptic symbols. Abstract shapes. Lines that mean nothing unless you speak the language. And since this is your house, you should speak it.
Let’s talk history for a second. People still call them blueprints. They used to be, well, blue. In 1861, a French chemist named Alphonse Louis Poitevin stumbled on a trick. He discovered iron gallate. Spread this chemical on paper. Expose it to sunlight. It turns blue. Shield it from the sun. It stays white.
Architects drew black lines on an original sheet. They clamped that to paper coated in iron gallate. They set it in the sun. The black lines blocked the light. The rest got baked blue. When dried, the original lines appeared white against a blue background. It was the first real photocopy machine. Technology moved on. Now everything is digital. Printed. Copied. But the visual language remains stubbornly unchanged.
What exactly is in a house plan?
A set of architectural drawings is not just a picture of your future home. It’s a technical instruction manual. It tells contractors where to put studs. Where to run wires. Where the plumbing goes underground.
If you’re looking at a set of plans for the first time, you might feel overwhelmed. The symbols are dense. The scales are confusing. But you don’t need to memorize every single icon to understand the basics. You just need to know what you’re looking for.
Most plan sets include several key views. The floor plan is the big one. It shows the layout from above. Walls. Doors. Windows. Fixed cabinetry. Stairs. This is where you visualize living in the space. Do the rooms flow? Is the kitchen too close to the dining area? Does the hallway feel cramped?
But a floor plan alone doesn’t tell the whole story. You also need sections. These are vertical cuts through the house. They show ceiling heights. The relationship between floors. The structure of the roof. Without a section, you don’t know if that open-concept living room has a vaulted ceiling or a flat one. You don’t know if the beams are exposed or hidden.
Then there are elevations. These look like front, back, and side views of the house exterior. They show siding materials. Brick patterns. Window trim. Roof pitch. If you care about curb appeal, these drawings matter. They show you how the materials come together.
Reading the symbols
The language of house plans relies on standardized symbols. They might seem random. They’re not. Once you learn a few, the rest make sense.
- Walls : Thick black lines. Solid walls are filled in. Partition walls might be thinner.
- Doors : A straight line for the door itself. An arc showing the swing direction. Always swing inward, unless it’s an exterior door or a utility room.
- Windows : Thin lines within the wall line. Often labeled with a number or code.
- Fixtures : Sinks. Toilets. Showers.

Reading the Blueprint: What’s Actually on Those Pages
Most homeowners treat plans as abstract art. They aren’t. They are a legalistic, technical instruction manual for your builder. Get it wrong, and you’re living with a leaky roof or a house that doesn’t square up. Get it right, and you know exactly what you’re paying for before a single shovel hits the dirt.
A drawing set covers everything from the curb appeal to the copper piping behind your drywall. It’s not just about where the walls go. It’s about how the house survives gravity, weather, and time.
Here is how to break down the standard house plan sections. Knowing these helps you catch errors early. It saves money. It prevents the “what did we do?” panic later.
The Cover Sheet and Foundation
Start at the front. The cover sheet usually features an artist’s rendering. It’s pretty. It sells the dream. But don’t get distracted. It’s not accurate. It’s marketing.
Real construction starts with the foundation plan. This is the house’s footprint on the ground. Look for excavation notes. If the soil isn’t stable, your foundation cracks. The plan will show where to dig, how deep to go, and where the concrete piers will sit. If this is wrong, nothing else matters.
Floor Plans and Interior Layouts
Floor plans are the most familiar part. One page per level. You’ll see rooms, walls, doors, and windows. Look closely at the electrical symbols. That little circle with a dot isn’t just decoration. It’s an outlet. Or a light switch. Or a junction box.
Don’t ignore the fixture notes. These specs tell the plumber and electrician exactly what model to install. Skip this, and you might end up with a showerhead you can’t afford to replace.
Interior elevations are the vertical walls. Think built-in bookshelves, kitchen cabinets, or fireplace surrounds. These drawings show the construction details. If you want custom millwork, this is where it’s defined. The contractor uses this to build it right the first time.
Roof, Exterior, and Structural Integrity
The roof plan shows the slopes and peaks. It’s an exterior view looking down. Check the overhangs. If they’re too short, your siding gets soaked by rain. The plan details the materials, too. Shingles, metal, tile? It matters for longevity.
Exterior elevations show all four sides of the house. They include exact measurements. More importantly, they list the cladding materials. Brick? Stucco? Vinyl? The finish details are here. This prevents the contractor from swapping expensive cedar for cheap pine without asking.
But the real safety net is the structural plan. This covers the skeleton. Trusses. Joists. Beams. Second-floor framing. These drawings ensure the house doesn’t collapse. They show how the load travels from the roof down to the foundation. If you’re planning to knock down a wall for an open-concept look, this is the section to check. It might be load-bearing. You’ll need a beam. And you’ll need a permit.
Wall Details and Insulation
Wall details reveal what’s inside the walls. This isn’t just drywall. It’s insulation. Vapor barriers. Fire blocking

Decoding the Blueprint Symbols
Forget the pretty artist’s rendering on the cover. That’s just marketing. The actual house plan is a map of standardized symbols. A builder doesn’t see “cozy living room.” He sees a door swing, a window placement, and an electrical outlet. Once you learn the language, you start seeing the house the way he does.
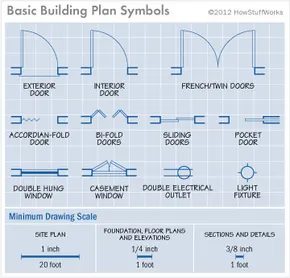
First, understand scale. Plans are drawn to scale, meaning every line represents a real-world measurement multiplied by a specific ratio. There is no universal standard, but you will commonly see these three:
* Site plans: 1 inch equals 20 feet.
* Floor plans, foundations, and elevations: 1/4 inch equals 1 foot.
* Sections and details: 3/8 inch equals 1 foot.
Because the plan is to scale, it shows exactly how parts relate to each other. An exterior wall that looks thicker than an interior wall on the paper will be thicker in real life. Don’t just glance. Grab a ruler. Pick a major room on the floor plan. Calculate its real-life dimensions. Compare that number to a room in your current house. Then, mentally map the hallways and traffic flow relative to that known space. It helps you grasp the actual volume of your future home.
Nearly every feature has a symbol. There are at least nine common symbols for doors alone. You need to know the difference between a French door, a standard swinging door, bi-fold panels, and accordion styles. Search for a symbol guide or ask your architect. Focus on doors, windows, and electrical outlets first. If you can read those, you can read the flow of the house.
Then there are the specifications. The drawings show size and shape. The spec sheet describes the guts. It lists fixtures, appliances, materials, and your personal preferences. Even if you buy a stock plan, there is wiggle room. You can change the wallpaper, the stain, the paint color, the hardware. Don’t skip this section.
Matching Style to Layout
Styles aren’t just about aesthetics. They’re about layout. Knowing the style helps you identify features on the plan before you even look at the roofline.
* Colonial: Central hallway. Square rooms on either side. Two large rooms in the back.
* Ranch: “L”-shaped. One story. Bedrooms grouped on one side.
* Victorian: Defined by fish-scale shingles and bay windows.
* Cape Cod: Two bedrooms upstairs. Sloped ceilings.
Identify the style on paper. It helps you picture the house in your mind.
Look closely at the materials. Weigh your desire for granite countertops against the cost of a larger footprint. Those nickel-and-dime upgrades add up. They break the budget. Also, remember that green design pays off long-term, but check the climate. Some energy-efficient techniques don’t work everywhere.
Plans can be changed. Troubleshoot on paper. It’s cheaper to move a wall on a blueprint than to move it after the concrete is poured. Work with your builder. Adjust the plan. Need more outlets in the office? Add them. Is your lot shaped oddly? Flip the plan to a mirror image. Will kids run through a tight hallway? Swap swinging doors for pocket doors.
The ideal home isn’t the biggest. It isn’t the prettiest. It fits your life. Think about what matters. Make sure those priorities are on the paper.


