You walk into a store. You see a sleek, new blender on the display. It’s shiny. It promises to puree ice cubes into snow with zero effort. But you rarely think about the grueling journey that object took to get there. Before it sat on that shelf, it survived design, prototyping, and production. Most consumers never see the messy middle part. The part where things break. The part where ideas die.
Let’s look at the kitchen appliance market. It’s crowded. To survive, you need more than just a “hot idea.” You need a blueprint. And not just a rough sketch. A detailed, interrogated plan.
Design Phase: Asking the Hard Questions
First, you determine the details. The more comprehensive this design stage is, the better. You can’t wing it. You have to ask specific questions. If you skip them, you’ll waste money on a product nobody wants.
Ask yourself:
– What are the product’s attributes and characteristics?
– What will the product offer that others on the market don’t?
– What is its function or purpose?
– Does any new technology need to be invented to manufacture the product?
– What is the product’s lifespan?
– How and where will it be manufactured, packaged, marketed and sold?
– How much will manufacturing cost, and how much will people be willing to pay for the product?
– Are there any issues with the product concerning government regulations, safety and environmental issues, patent infringements, or other potential hang-ups?
If the answers give you the green light, you’re ready for the next step. Building a prototype.
Prototyping: From Drawings to Physical Models
Different types of prototypes help at different stages. Don’t overcomplicate it early on. A drawing might suffice at first. It’s cheap. It’s fast. You can change it in seconds.
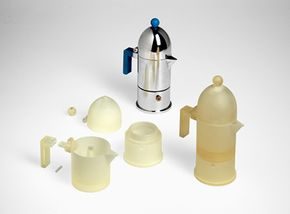
But eventually, you need something you can hold. A simple prototype. Use it as a visual aid. It doesn’t need to be full-sized. It doesn’t need to stand up to rigorous testing. It just needs to show the concept.
You might also want detailed physical prototypes of specific portions. Think of a complex mechanical gear system. You wouldn’t prototype an entire bicycle just to check how a new chain drive runs. Focus on the critical components. Test them. Break them. Fix them.
Sometimes you bounce back and forth. Tweaking design plans. Rough prototyping. Repeating. If the product has issues, you’ll see them here. Early is cheap. Late is expensive.
As the process moves along, you’ll want a prototype that mimics the final product. This is where you settle the final design questions. You test everything. You fine-tune. You perfect.
Now that you’ve seen the basic early design and prototyping, let’s see how pros get their hands on some pretty hardcore prototypes.
Prototype Design
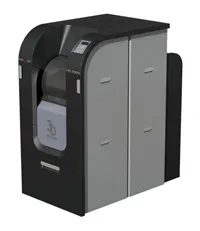
Basic questions are answered. The obvious kinks are ironed out. Now the serious work begins. This is where prototyping moves from sketchy ideas to concrete reality.
Designing advanced prototypes usually means bringing 3-D CAD (computer-aided design ) software into the mix. You are creating a precise 3-D map of your product. If you plan to bring this into actual production, CAD is the standard path. It allows you to carefully verify functionality before spending money on tooling. It also serves a practical purpose. You can transfer product specs clearly and concisely to the manufacturer. No ambiguity. No guesswork.
The capabilities of CAD software are extensive. You can design in both 2-D and 3-D. Switching between views is seamless. If your product has dozens of parts, you can design each one individually. Then, add them to the overall assembly one at a time.
Here is where it gets efficient. Adjust one part? The software updates the other dimensions automatically. Those changes integrate into the overall prototype design without manual recalculations. You get realistic images with captions, close-ups, and side views. You can test material finishes. Chrome? Steel? Wood in a matte or gloss finish? Textured or brushed? The options are nearly endless.
Many design actions are automated. The software handles the tedious stuff. A key feature is simulation. You can see all parts in motion. Watch how they operate. Or watch how they fail to operate. Catching interference early saves weeks of rework.
Once your 3-D CAD plans are locked in, the next step involves specialized hardware. This technology is becoming increasingly popular among innovators. Why? Speed. Accuracy. The physical prototype begins to take shape from the digital file.
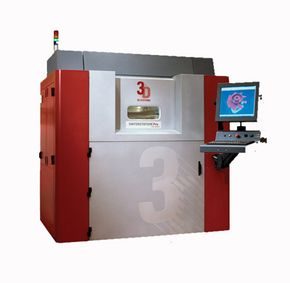
You have the CAD file. You have the budget. Now you need the physical object.
If you aren’t building something from raw lumber or sheet metal yourself, you are likely looking at rapid prototyping to bridge the gap between design and reality. It’s the standard way to get a tangible model fast.
This approach didn’t just appear overnight. It started in the late 1980s with stereolithography. The name is clunky, but the concept is straightforward. It wasn’t long before engineers realized this wasn’t just for making one-off models. You can use these machines for market testing, small-batch production, or custom parts. Because the technology is so varied, nobody agreed on a single name for it.
What is the best term for 3D printing technologies?
Look past the marketing jargon. All these different methods share one core trait: they add material rather than subtract it. Additive fabrication is the most accurate technical term.
Over the years, the industry has thrown around terms like solid freeform fabrication, automated fabrication, rapid technologies, layered manufacturing, digital fabrication, and 3-D printing. There are dozens of others. It’s messy.
But the mechanics are consistent. These machines build objects by joining extremely fine layers of material. Two things matter here: the substrate (what you’re printing with) and the binding method (how it sticks).
Common Additive Fabrication Processes
Different jobs require different machines. Here is how the major players work:
- Stereolithography (SLA) : A laser traces a pattern across a vat of liquid photopolymer resin. The UV light hardens the resin where it touches. The build platform lowers, and the laser repeats the process.
- Selective Laser Sintering (SLS) : Also uses a laser, but targets powders. It melts layers of thermoplastic and other polymers together.
- Laminated Object Manufacturing (LOM) : Think of it as laser-cutting paper or plastic sheets. Sheets are rolled out, cut to shape, and glued to the previous layer.
- 3-D Printing (Binder Jetting) : An inkjet-like head sprays liquid adhesive onto layers of powder. The powder sticks where the glue hits.
- Electron Beam Melting (EBM) : This handles dense metals. An electron beam—more powerful than a laser—melts powder like steel, titanium, or cobalt chrome. It’s used for making and repairing heavy-duty parts.
- Fused Deposition Modeling (FDM) : The most common desktop method. Plastic filaments or pellets are heated, pushed through a nozzle, and deposited layer by layer.
Dealing with Overhangs and Post-Processing
Complex geometries often need help. If your design has overhangs or undercuts, the printer needs support structures. You can design these manually or let the software generate them automatically.
Once the print finishes, the support material isn’t part of the final product. You’ll need to remove it. This usually involves brushing, dissolving in chemicals, or melting away the supports.
Other post-production steps depend on the material. Some prototypes require curing under intense light to reach full strength. Others need a hardener or a surface finish to look professional.
The Cost and Time Trade-off
It’s not all magic. There are real drawbacks to consider.
While you won’t wait months for a prototype, you will wait. Hours or even days are normal as layer upon layer is laid down. Speed varies wildly by technology.
Then there’s the money. Industrial-grade systems can cost several hundred thousand dollars. That’s out of reach for most homeowners. But the market has shifted. Smaller, affordable desktop machines are everywhere. Some companies even offer on-demand prototyping services where you upload your specs and pay an hourly rate to have the part made.
You have the object. It’s sitting on your workbench.
Now you have to ask: Does it work?
Prototype Testing
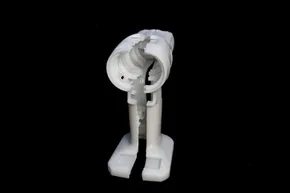
Why prototypes matter for your bottom line
You don’t build a prototype just to look cool. You build it to find out where the design breaks. That is the single most important reason to invest time in this stage. Testing reveals flaws before you spend money on mass production. It also checks if the product is actually easy to use. If customers can’t figure out how it works, you have a failed product. Period.
The biggest benefit is financial. Fixing a design flaw in a prototype costs pennies. Fixing it in a finished product costs thousands. Or millions. You need to ensure functionality works as intended. You also need to ensure the user interface makes sense. A confusing product will fail in the market, no matter how clever the engineering.
Speed is currency
Time is the enemy of innovation. Your competitor is likely working on the same idea right now. Being first to market gives you an advantage. Consumers pay more for novelty. They build brand loyalty faster. You make more profit. Rapid prototyping accelerates this timeline. It lets you iterate quickly. It gets your product into hands sooner.
But speed isn’t the only gain. A physical prototype is a powerful sales tool. You can show it to investors. You can present it to upper management. A drawing on paper is abstract. A working model is real. It proves your concept has teeth. It makes pitching your idea much more persuasive.
Safety isn’t optional
You need to test for danger. Real danger. Not just theoretical risk. Will the product hurt someone if it’s misused? You have to determine the odds of an accident. You have to judge the severity of the outcome. Can you design the risk away? Or can you just minimize it?
If you can’t eliminate the risk, you need warnings. Labeling must be clear. Instructions must be accessible. Consider users with different skill levels. Consider users who speak different languages. You learn all this by studying the prototype. You study your business plan. You analyze the market.
Do this before the assembly line starts. You need to know everything will go off without a hitch. In the United States, check the Consumer Product Safety Commission website. They have guidelines for almost every type of product. If you are elsewhere, look for your local equivalent. It exists. It’s not hard to find. Ignoring it is a mistake.
From prototype to production
Once the prototype passes these tests, it moves to the assembly line. The design is finalized. The safety is verified. The market appeal is confirmed. This is where you prepare for scale. You look into legal protections for your new product. You secure your intellectual property. The hard work of invention is done. The work of selling begins.
But the cycle doesn’t really end. It just changes shape.
Where to Dig Deeper
If you’re still hungry for more on how things get built, the internet has shelves of it. You might want to look into how cutting-edge technology integrates into new product designs. It’s a rabbit hole, but a good one. There are lists of cool tools, debates on which workshop tool is the most expensive, and deep dives into how laser printers, inkjet printers, and even bubble jet printers actually work. Light? Lasers? Photocopiers? Film? Offset printing? It all connects. And if you’re looking at rapid prototyping, you need to understand stereolithography—3-D layering. That’s the core mechanic behind the magic. Dye sublimation printing is another angle worth exploring if you’re into materials.
Practical Resources for the Builder
You don’t need a corporate budget to access the same info that engineers do. Start with Consumer.gov for straightforward advice on your rights. Need to see what’s already out there? Free Patents Online lets you search patents for free. It’s a great way to check if your idea is truly new or just a rehash. The United States Patent and Trademark Office is the official source for protecting your big idea. Don’t skip this step. If you’re making consumer products, the United States Consumer Product Safety Commission has a specific guide on developing product instructions. Read it. It’s not just legal jargon; it’s about keeping people from getting hurt when they try to use what you built.
The Source Material
This isn’t just random links. These are the anchors.
- The history of CAD/CAM software, traced back to 2004.
- Definitions of 3-D printing and rapid prototyping from PC Magazine.
- The step-by-step process of developing a prototype, according to Prototype Zone.
- The Merriam-Webster definition of “prototype.”
- RBC Product Development’s take on proofs of concept.
- The US CPSC’s guide to consumer product instructions.
- SolidWorks tutorials, including video content from SolidProfessor.
- Articles from Entrepreneur Magazine on moving beyond the initial idea.
- Engineering design processes from Synthesis Engineering Services.
- The University of Louisville Rapid Prototyping Center.
- Detailed histories of additive fabrication by Terry Wholer and Tim Gornet.
- Clarification on terminology confusion in the industry.
- Castle Island’s worldwide guide to rapid prototyping.
It’s a lot of text. A lot of links. Most of it is from 2008. But the physics doesn’t change. The tools might. The software updates. The underlying principles of how you go from a sketch to a physical object remain the same. You build. You break. You fix. Then you build again. The resources are there. You just have to click.