You spend enough time inside. Rearranging furniture. Choosing paint swatches. It’s easy to get stuck in that loop. But there is a whole world waiting just past your back door. Spring, summer, fall. The air is crisp. The sun is up. Staying cooped up makes no sense.
Comfort doesn’t have to stop at the threshold. You can bring your creature comforts outside. It requires a few adjustments. Small tweaks that turn a patch of grass or a concrete slab into a real living space. Functional. Inviting. An extension of your square footage.
Imagine hosting dinner al fresco. Watching the sunset with neighbors. The setup matters. Get it right and the outdoors becomes your favorite room. Here are ten ways to make that happen. Let’s start with the most visible element.
Why Color Is Your Best Outdoor Tool
Be bold.
Indoor design rules often whisper about neutrals. Beige. Gray. White. Outside, those rules fall apart. The environment is loud. Trees. Sky. Grass. Buildings. Your space needs to hold its own. Color pops against natural backdrops in a way it never could indoors.
It’s not just about paint. It’s about textiles. Rugs. Pillows. Planters. Even the furniture itself. A bright red chair cuts through green foliage. A navy cushion grounds a wooden deck. You are defining the space.
Color defines the mood of an outdoor room. Without it, you’re just looking at a patio. With it, you’re looking at a destination.
Start small if you’re nervous. A throw pillow. A small outdoor rug. See how the light hits it at different times of day. Morning sun brings out yellows. Evening shadows deepen blues. The color changes as the day progresses. That’s the beauty of it.
Don’t be afraid to clash. Nature does it all the time. Purple flowers against green leaves. Orange sunsets against blue water. Your yard should reflect that same energy. Pick a hue that makes you happy. Then double down.
This approach works for front yards too. A bold door color. Brightly colored planters lining the walk. It signals welcome. It signals personality. It says, “Someone lives here. Someone cares.”
The investment is low. The return is high. You spend more time outside because it feels better. It feels intentional. It feels like you.
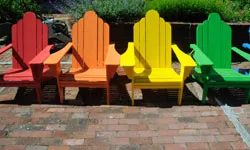

Skip the earth tones outside. They shrink into the foliage. Brown and green merge in the yard. Black looks chic inside. Outside it absorbs heat. You will burn your skin. The sun turns black furniture into an oven.
Instead of blending in. Stand out. Add a splash of whimsy. Pick bold accessories. Swap faded cushions. Go bright.
“Bright blue, red and yellow Adirondack chairs or a pink picnic table might not sound like everyone’s cup of tea — and indeed those colors might be a bit overwhelming inside the home — but outside they’ll add an element of playfulness and fun.”
Think pink picnic tables. Blue Adirondacks. Yellow accents. These colors overwhelm an interior. Outside they work. They bring playfulness. They bring fun.
Look for patterned hammocks. Hang Chinese paper lanterns. The right outdoor lighting can make a huge difference after dark.
9: Create Drama with Lighting
Darkness changes the vibe. You need light that pops. Not just functional. Dramatic.
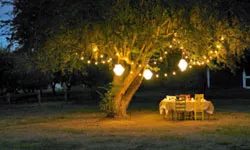
You don’t need December to hang a single string of lights. When the mercury rises, your outdoor zones shouldn’t just be for daytime lounging. You want to extend the usability of your patio or deck well into the night. The trick isn’t just about visibility. It’s about vibe. And safety.
Dark corners are trip hazards. Concrete steps vanish after sunset. A poorly lit walkway is a liability. But beyond the practical need to avoid bruised shins, proper illumination reshapes the space. It turns a bare patch of grass into a destination.
Most modern setups rely on electric bulbs. LED strips, path lights, uplights. They’re efficient. They last. But if you want that softer, flickering warmth, lean into fuel sources. Gas or oil lanterns. Torches with scented oils. They provide a glow that electric bulbs struggle to mimic.
Placement matters more than brightness. Aim for intent.
Lighting around the exterior of a house pointed upward dramatically accentuates architecture. Light pointed downward creates a softer, cozier glow.
Think about what you’re highlighting. Uplights on tall trees or textured stone walls? They create drama. They pull the eye upward. Downlights on a deck floor or patio table? They keep things intimate. They reduce glare.
The less attractive elements of your yard—the utility boxes, the overgrown shrub corners, the ugly fence posts—can disappear into the shadows. You control what the eye sees. You control what stays hidden.
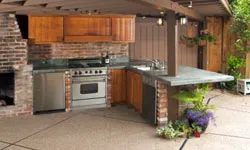
8: Go Big with an Outdoor Kitchen
If lighting is the atmosphere, the outdoor kitchen is the heart.
This isn’t about slapping a propane burner next to a grill. This is about building a functional workspace that rivals your indoor setup. You’re looking at durability. Weather resistance. Ease of cleaning.
Start with the layout. You need a triangle of sorts. Storage. Prep space. Cooking surface. If you’re tight on square footage, integrate a compact sink. A small one works. Just make sure you have access to water and drainage. Plumbing in the outdoors is a headache if you don’t plan for it. Use frost-proof hoses or shut off and drain lines before winter hits.
Materials are non-negotiable here. Indoor cabinets will warp. Rust. Swell. You need marine-grade plywood, stainless steel hardware, or powder-coated aluminum. The top surface? Granite, quartz, or concrete. Wood is beautiful until it’s soaked with rain and left to rot. If you use wood, seal it. Religiously.
Appliances should be rated for exterior use. A standard indoor fridge doesn’t handle humidity and temperature swings. Look for units with sealed compressors.
And don’t forget the safety gear. A fire extinguisher is mandatory. Not optional. Keep it mounted near the cooking zone. But not in the cooking zone where it might fall into the flames.
The goal is seamless entertaining. You’re not stuck in the kitchen while your guests are outside. You’re out there with them. Sizzling steaks. Chopping veggies. Laughing over the heat of the grill.
It requires upfront investment. More than just buying a portable stove. But the return? It’s in the way the space feels once you’ve committed to the details.
Add Warmth with a Fireplace or Fire Pit
The grill takes center stage, sure. But it’s not the only thing keeping guests around when the sun dips below the horizon.
Add a fireplace or fire pit to the mix.
It’s about more than just s’mores. It’s about extending the usable hours of your outdoor kitchen. Once the temperature drops, people migrate toward the heat. They linger. They talk. The party doesn’t end just because the cook is done flipping burgers.
You can integrate this directly into the kitchen structure or set it apart as a focal point in the seating area.
How to choose between a fireplace and a fire pit:
- Gas fireplaces: Clean burn. Easy ignition. No smoke to irritate eyes or cling to hair. Great for urban backyards or places with strict burn bans. You control the flame with a switch.
- Wood-burning fire pits: Real aroma. Crackling sound. The classic experience. But you need storage for firewood. You need to manage ash. And local regulations might restrict open wood burns in dense neighborhoods.
- Propane fire pits: A middle ground. You get the look and heat of wood without the smoke or cleanup hassle.
Where to place it:
Don’t put it right next to the grill. Heat from the cooking station can interfere with the comfort zone of the seating area. Position the fireplace so it faces the seating, not the cooking line.
Think about wind direction, too. You don’t want smoke blowing into the food prep zone or into guests’ faces.
Materials matter:
If you’re building in, use non-combustible materials. Stone, brick, concrete, or metal. Keep flammable materials like wood decking or fabric furniture at a safe distance. At least six feet is a good rule of thumb.
Check your local codes. Some municipalities have specific requirements for fire features in residential zones. Permits might be needed. Insurance companies may require certain clearances.
Seating around the fire is essential. Benches, Adirondack chairs, or built-in stone seats. The goal is comfort. You want people to sit for hours.
The right setup transforms a cold patio into a cozy gathering spot long after the main course is served.
It’s a simple addition. But it changes the entire vibe.
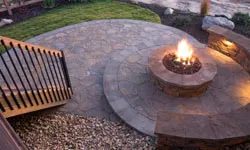
Fire is primal. It defined us. It still hooks us.
You can turn a boring backyard into a cozy retreat just by introducing flame. It keeps you outside when the summer nights get chilly. It extends the season in warmer climates, too.
Cost varies wildly. You can dig a hole. That’s the cheapest route. Or you can install a marble gas fireplace. That will cost a fortune. The choice is yours.
Portable and DIY Fire Options
If you live in a city, space and regulations are tight. A portable fire pit solves this. It’s an elevated bowl with a screen. You can move it around. It fits on decks or patios where ground fires aren’t allowed.
DIYers love this. You can build your own pit from bricks. Flagstones work well too. They look rustic and natural.
Then there is the chiminea. It’s an outdoor fireplace with a short chimney. It looks distinctive. It directs smoke upward better than a simple pit.
Check Local Codes First
Before you light anything, check the rules. Fire codes differ by town. Some places ban open fires entirely. Others have strict distance requirements from property lines.
Make sure it’s legal. You don’t want a fine ruining your relaxation. Verify what is permitted in your area before you buy materials or dig.
6: Bring Serenity with a Water Feature

You’ve got earth, fire, and air. The last classical element missing from your outdoor living space is water. Fire brings warmth, but water offers sound and cool tranquility.
Water features take many forms. You can choose small store-bought fountains or cascading waterfalls. The choice depends on how wet and wild you want the space.
Koi Ponds and Exotic Gardens
Koi ponds are small garden ponds filled with colorful carp. They have become popular in landscape design. The fish transform almost any setting into an exotic Eastern garden.
Keep koi ponds in mild climates. If the pond freezes for more than a few days, the fish will suffocate. This is a hard limit for this type of feature.
Low-Cost Fountain Options
For a less expensive option, consider small and medium fountains. Many hardware stores and nurseries sell these units. They can be mounted on a wall or perched on a pedestal.
These are less labor-intensive than digging a pond. You avoid the heavy lifting and waterproofing work. Just plug them in and enjoy the sound.
5: Don’t Forget Your Living Room


Creating Conversational Zones Outside
You don’t need a traditional living room to apply social design principles. Most homeowners instinctively push patio furniture against the house. This creates a dead zone where guests sit with their backs to the interior, facing the yard. It kills conversation.
Instead, arrange seating to face inward. Place a sofa against a wall or railing, then add chairs or a love seat opposite it. This creates a natural circle. People talk easier. Cards get played. Dinners feel intimate, not exposed.
This works on porches too. If you have space, add a second seating element facing the structure. Suddenly, your outdoor area functions like an indoor room.
Establishing Boundaries and Privacy
Define Your Space Clearly
An open deck feels endless. A defined room feels safe. Use railings, screens, or planters to create walls. This psychological boundary signals “stay here.”
Start with flooring. Different materials—like deck tiles in a square—mark the zone. Add a rug. It anchors the furniture. Without it, the space feels temporary.
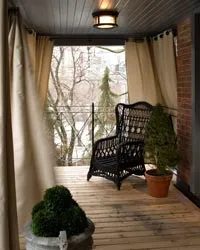
Use vertical elements. Tall grasses in pots. Lattice panels. Drapes. These create walls. They block wind. They add privacy. Your guests stop feeling watched.
Choosing the Right Enclosure Materials
| Material | Best For | Pros | Cons |
|---|---|---|---|
| Lattice Wood | Porches | Cheap, easy DIY, looks classic | Needs painting/staining, rots if not maintained |
| Metal Screens | Patios | Modern look, durable, low maintenance | Can be expensive, sharp edges |
| Planters | Decks | Natural privacy, adds greenery | Heavy, requires watering, limited height |
| Outdoor Curtains | Pergolas | Soft look, blocks sun/wind | Fades in sun, needs sturdy rod system |
Installation Tips for Privacy Solutions
Measure twice. Cut once. This applies to lattice and screens. Make sure your posts are anchored securely. Use concrete for permanent structures. For temporary setups, weighted bases work.
“Privacy isn’t just about hiding. It’s about creating a container for conversation.”
If you use railings, add privacy slats. They slide into existing gaps. Cheap. Effective. No tools needed.
For wind, consider a solid screen on the prevailing wind side. It breaks the gust. Your guests stay comfortable.
Don’t overdo it. Too much enclosure feels like a cage. Leave gaps. Let light in. Balance is key.
Lighting the Enclosed Space
Once you have your room, light it. String lights across the top. Spotlights on plants. Lanterns on tables. This extends usability into the night.
Safety first. Keep pathways clear. Use low-voltage lights for wet areas. Ensure all outdoor-rated fixtures are GFCI protected.
Your outdoor room is now complete. It has zones. It has walls. It has light. It works.
Next, we tackle the ceiling.


You need boundaries. Not walls that box you in, but markers that say this is the lounge area and that is the lawn. Without them, a backyard just blurs into a generic patch of green. It lacks intention.
Start with the floor. A seating zone needs its own foundation. Concrete pavers. Crushed gravel. Brick laid in a herringbone pattern. This physical change in texture tells your brain you’ve arrived somewhere specific. It separates the functional space from the decorative grass.
Then, look up.
Pergolas solve the problem of vertical definition without closing off the air. They create a ceiling-like effect that feels open. You get shade from the overhead slats but keep the breeze moving. The key is framing. Use the posts to anchor the space.
“Pergolas are a popular choice for outdoor living spaces, since they provide a sense of enclosure that still feels wide open and lets in plenty of sunlight.”
Most people let the plants do the heavy lifting here. Don’t just bolt wood to the ground and call it a day. Plant climbing vines along the lattice. Wisteria. Jasmine. Even hardy ivy if you want year-round structure. The greenery softens the rigid lines of the wood or metal. It makes the structure feel like it grew there, rather than being installed.
Low retaining walls serve a similar purpose. They don’t need to be high. Six inches is enough to shift the floor level slightly. That tiny elevation change creates a psychological shift. You’re not just sitting on grass anymore. You’re in a room.
3: Use Outdoor Products
Why Standard Furniture Fails Outdoors
You can spend thousands on a sectional sofa, only to watch it rot in six months. The problem isn’t the design. It’s the materials. Indoor fabrics and woods simply cannot handle UV rays, rain, and temperature swings.
If you’re building an outdoor space, your furniture needs to match the durability of your hardscaping.
Choosing Materials That Last
Not all “outdoor” furniture is created equal. Some brands slap a water-resistant coating on cheap pine and call it a day. That will peel and warp by next spring.
Look for these specific traits:
- Teak or Cedar: These woods contain natural oils that repel moisture. They age to a silver-gray patina if left untreated. It looks better than painted wood that’s peeling.
- Powder-Coated Aluminum: Lightweight and rust-proof. The powder coat is baked on, so it won’t chip like standard paint.
- All-Weather Wicker: Look for resin wicker, not natural rattan. Natural fibers absorb water and mold. Synthetic wicker can sit in the rain for weeks and stay dry.
- Marine-Grade Vinyl: If you want cushions, this is the only fabric worth buying. It’s UV-stabilized and quick-drying.
Installation and Safety Tips
When you’re assembling these pieces, don’t just dump them on the gravel.
- Level the Base: Uneven ground wobbles chairs and cracks frames. Use a spirit level. Pack down the gravel underneath before laying pavers or placing furniture legs.
- Anchor Heavy Items: If you’re in a windy
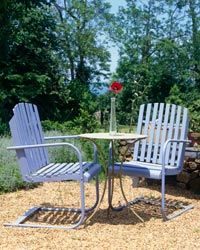
You can’t hide your outdoor sanctuary. It’s exposed. Rain, wind, UV rays, and humidity don’t care about your decor preferences. If you leave standard indoor gear outside, you’re basically throwing money away.
Choosing Gear That Survives the Elements
Stop dragging your living room sofa onto the patio. It will rot. It will mold. It will look like a disaster within a season. You need furniture built for the abuse.
Look for weatherproof materials. Aluminum holds up. Teak ages gracefully if you maintain it. Synthetic wicker resists moisture. Avoid cheap fabrics that soak up water and never dry. Sunlight fades colors. Wind flips cushions. Invest in pieces with tight weaves and water-resistant coatings.
Properly waterproofed wood or metal benches can go for years in the rain without sustaining damage. That’s not a promise. That’s physics.
The Outdoor TV Problem
Lounge on the porch? Sure. But watching a standard TV outside is miserable. Glare washes out the image. The sun bleaches the screen. The heat stresses the components.
If you want to catch up on your favorite TV programs, you need an outdoor television. These units are built with anti-glare screens. They offer higher contrast ratios to combat bright daylight. They’re sealed against dust and moisture. Don’t skip this. Watching a washed-out screen on a humid evening kills the vibe faster than anything else.
Preparing for the Cold
Winter doesn’t care that you love your deck. Freezes expand. Cracks form. Metal corrodes.
You have to winterize your space. This isn’t optional if you want to reopen in spring without a rebuild.
Steps to Winterize Your Outdoor Space
- Clean everything. Dirt holds moisture. Moisture leads to rot and rust. Scrub surfaces. Remove stains.
- Store or cover. If you can’t bring furniture inside, use heavy-duty, breathable covers. Plastic traps condensation. Condensation breeds mold. Breathable fabrics let moisture escape.
- Drain water systems. If you have outdoor faucets or irrigation lines, drain them. Frozen pipes burst. Burst pipes flood your foundation.
- Inspect for damage. Look for loose screws. Check for splintered wood. Fix small issues before the cold sets in.
- Disconnect electronics. Take down the outdoor TV. Store it in a dry, temperature-controlled space. Cables degrade in freezing temps.
Why This Matters Now
Ignoring winter prep leads to expensive repairs. A rotted deck board costs hundreds to replace. A rusted chair is gone. A fried TV screen is trash.
Do the work now. The cold will come regardless. Make sure your space survives it.
The difference between a ruin and a retreat is often just a few hours of preparation before the first frost.
1: Centralize
Winter isn’t just about surviving the cold—it’s about preparation. You want to spend your evenings wrapped in a blanket with a hot drink, not fighting with frozen patio furniture.
Most homeowners don’t think about their outdoor spaces until spring arrives. By then, it’s often too late. The damage is done. Mold sets in. Wood rots. Metal rusts.
Start by centralizing. Move everything you can inside.
Bench? Bolted down? Fine. Leave it. But every movable piece of furniture needs a new home. Garage? Shed? Basement? Doesn’t matter where, as long as it’s dry.
Stack them. Store them. Cover them if they must stay outside.
But here’s the thing: if you can’t move it, you must protect it.
2: Clean Before You Cover
This is where most people go wrong. They toss a cover over a dirty deck and call it a day.
Wrong.
Moisture gets trapped. Mold grows. Stains set in. It’s a recipe for disaster.
Clean your outdoor spaces before winter hits. Sweep away leaves, dirt, and debris. These materials hold moisture against the wood, accelerating decay.
For deep cleaning, use a bleach solution. One part bleach to three parts water. Scrub thoroughly. Rinse well. Let it dry completely.
Why? Because standing water in freezing temperatures expands. It cracks wood. It promotes mildew. It turns your spring gathering spot into a sanitation hazard.
3: Seal and Protect
Once clean and dry, seal your wooden structures.
Use a high-quality exterior wood sealant. Apply it according to the manufacturer’s instructions. Two coats are usually best.
This creates a barrier against moisture, UV rays (yes, even in winter), and temperature fluctuations.
For metal furniture, check for rust. Sand it down. Prime it. Paint it.
For wicker, bring it inside. Even synthetic wicker can degrade under prolonged exposure to freezing rain and snow.
4: Drain and Disconnect
Outdoor faucets? Disconnect hoses. Drain them. Insulate them.
A frozen pipe can burst. That’s a $5,000 repair if it’s inside your walls. A $20 faucet cover prevents it.
Pool owners: follow the manufacturer’s winterization guide. Shut off the pump. Lower the water level. Add chemicals. Cover it.
Don’t skip this step. Frozen water expands. It cracks pipes. It ruins pumps. It’s expensive.
5: Inspect and Repair
Before you close up for the season, do a final inspection.
Check for loose boards. Wobbly railings. Rusty screws. Cracked tiles.
Fix what you can. Leave a list for spring if the job is too big.
A small repair now prevents a major disaster later.
The Bottom Line
Winter is a test of preparation.
Centralize. Clean. Seal. Drain. Inspect.
Do these steps, and your outdoor space will be ready for spring.
Skip them? You’ll be spending your weekends sanding, sealing, and replacing.
Which is more appealing?
The choice is yours.
Quick Checklist:
- [ ]

You built the space to live in it. Not just to look at it from the kitchen window. Sure, setting up two deck chairs and staring at the fence is peaceful. It is quiet. It is private. But it is terrible for hosting.
Try hosting a dinner party with everyone’s backs to a solid wall. The conversation dies instantly. People can’t see each other. They can’t catch eye contact. It feels like an interrogation room or a waiting area.
Seating Arrangements That Force Interaction
The fix is simple but often overlooked. You need a central point.
Think about how you arrange furniture indoors. You don’t push the sofa against the far wall and leave the center empty. You create a circle. Or a U-shape. Outdoor spaces should work the same way.
Place seating that faces inward. A bench. A cluster of lounge chairs. Even a swinging chair can serve if positioned correctly. The goal is visibility. Everyone needs to see everyone else.
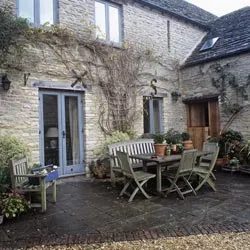
If you have space, add a picnic table. It’s versatile. You eat at it. You play cards on it. You use it as a staging area for drinks. It anchors the zone.
But a table isn’t the only option.
Beyond the Furniture Store
Focal points don’t have to come from a catalog.
Consider your existing landscape features. Is there a fire pit? Good. That’s your center. Water feature? Even better. The sound masks background noise and draws people in.
What if you don’t have hard infrastructure?
Use the green.
A large flowering tree. A tall rose trellis covered in blooms. These are natural anchors. They draw the eye. They create a sense of enclosure without physical barriers. You organize the seating around them.
Maximizing Small Footprints
You don’t need an acre. You need intention.
Look at what you have. Is it a tiny patio? Is it a sprawling lawn?
In a small space, the focal point is everything. It defines the boundary. It tells guests where to stand. Without it, people just wander. They cluster awkwardly. They drift away.
With a clear center, the energy stays contained. The conversation flows.
Practical Considerations for DIYers
If you’re building this setup yourself, keep it simple.
Don’t overcomplicate the layout. Measure the space first. Sketch it out. Place your main anchor in the middle. Arrange seating within arm’s reach of the center, but far enough apart to avoid elbow bumps.
Safety matters too. Keep pathways clear. Ensure lights are placed so no one trips over a chair leg in the dark.
The material you choose depends on your climate. Wood needs sealing. Metal can get hot. Plastic fades. Pick what lasts.
Why This Works
People gather to connect. Not to stare at a blank wall.
When you create a center, you remove the friction of awkward introductions. The space does the work for you. It guides behavior. It encourages lingering.
You spend more time outside because it feels intentional. Not accidental.
What happens when the sun goes down? Does the light follow the center? Does the heat source pull people in?
The setup is only half the equation. The atmosphere is the rest.